What Is the Largest Size You Can Upload to Cricut Design Space
Did you know that yous tin can upload your ain images into Cricut Blueprint Space? It'south true! One of the most powerful features of Cricut Design Space is its ability to accept your uploaded images and convert them into cuttable shapes.
Whether yous desire to use your own designs, drawings, family photographs, learning how to upload your own images to Pattern Space lets y'all brand crafts that are uniquely yours.

Cricut beginners oft ask me: "Tin can I upload my own images with Cricut?" And I always answer them with an enthusiastic, "Yes!" One of the greatest things about Cricut and Pattern Infinite is that yous upload any image you want – for free!
Ready to learn more most how to upload images to Cricut Design Space? If then, then this blog post is simply for you. We'll talk a piddling bit well-nigh the types of files y'all can use, where to find the best SVGSs, and how to upload them to Blueprint Space. We'll even talk well-nigh some common issues you may run into when uploading files.
How to Upload Images to Cricut Design Space
In this step-past-step tutorial, I'll show you but how easy information technology is to upload your own images into Design Space. All it takes is 4 simple steps (or but 3 steps if you're using SVGs!)
- Open up the Cricut Pattern Space app and get-go a new projection.
- Click the Upload button, and select the image file yous want to upload.
- Select the image blazon and remove the groundwork with the various eraser tools. (For raster images only.)
- Name the image, add tags, and click Upload to complete.
Y'all can use these steps when uploading pictures from the Cricut Design Infinite app on your desktop, laptop, or mobile device (like an iPhone or iPad).
Brand new to Cricut? Start with this helpful guide.
At present, let'south walk through the procedure in more item.
The Ii Master Types of Images
There are two main categories of image files that you can upload to Cricut Design Space: raster images and vector images.
It'southward important that you empathize the bones differences between the two file types, simply I hope we won't go as well technical or complicated.
Raster Images
Raster images are basic images made up of tiny dots of color, chosen pixels. Digital photos, drawings, and scanned artwork are all types of raster images. A lot of free clip art images are as well raster images.
Raster images finish in file extensions like .png, .jpg, .jpeg, .gif, and .bmp. These types of images are created in programs similar Photoshop, Procreate, or Paint.
Raster images will be uploaded to Design Space every bit a single layer. You tin can save them as a Impress Then Cutting image or a solid cuttable shape to use in other types of Cricut projects.
Vector Images
Vector images are graphic images designed with lines and points. When people talk near SVGs, they're talking almost vector images.
Vector image files end in file extensions like .svg. .eps, or .dxf. These types of images are created in programs like Adobe Illustrator or Inkscape.
SVG images are the most mutual blazon of cutting file to use with Cricut Design Space. SVG stands for "scalable vector graphic". That means you tin brand the SVG image equally large or small every bit you desire, without it looking pixelated or blurry.
Why I prefer vector images for Cricut projects
Vector file type images are special because they are much more versatile, flexible, and piece of cake to use with Cricut Blueprint Space. Considering they are designed with paths and points, vector images can create a much cleaner cut than jpg or png images.
What's more, SVG files can contain complex designs fabricated from multiple shapes. Cricut Design Space volition read and process these shapes for you, separately the image into different layers as necessary.
Where to discover new SVGs to upload
You lot tin find gratis clip art images on websites like rawpixel.com, or premium SVG files on websites similar Etsy.
If yous buy SVG images from Etsy or other blueprint sites, you will need to upload them to Design Space before using them in your Cricut projects.
- Start, download the cut file.
- If it comes in a zip file, you lot will need to unzip it.
- And so, you lot can upload the unzipped file to Pattern Infinite.
Notation: Non all clip fine art yous find online is costless for the taking. Read and respect the intellectual property rights of other designers and only upload images yous own and are authorized to use.
How to upload an image to Design Space
Footstep 1. Open up the Cricut Design Space software and outset a new project. Select the Upload button at the bottom of the left pattern console. Select Upload Image to upload an prototype to use in a design. You tin can choose an image with 1 of these compatible files types: .jpg, .gif, .png, .bmp, .svg, or .dxf.
(Note: You are non currently able to use .dxf files in the iOS or Android versions of Pattern Space.)

Stride two. Select the Browse button to locate the image you desire to use from your computer. Or, if you have the image files ready, you can drag and drop the file into the upload window.
If you upload a raster image (a bones image that ends in .jpg, .gif, .png, or .bmp), you volition see the Basic Prototype Upload screen side by side.
If you upload a vector image (a scalable prototype that ends in .svg or .dxf), you lot will come across the Vector Prototype Upload screen next.

Choice 1: Uploading Basic Images (Raster Images)
Once you lot have selected the image, yous volition see the Basic Image Upload Screen. You will meet a preview of your uploaded image on the left.
Step three: Clean up the image.
Design Space volition prompt yous to select your image blazon on the right. Select the image option that best matches the complexity of your image. If your blueprint is unproblematic with clean edges and shine lines, choose Simple. If your design is more than complicated with multiple colors, textures, or patterns, choose Complex. (When in doubt, I tend to choose Complex.)
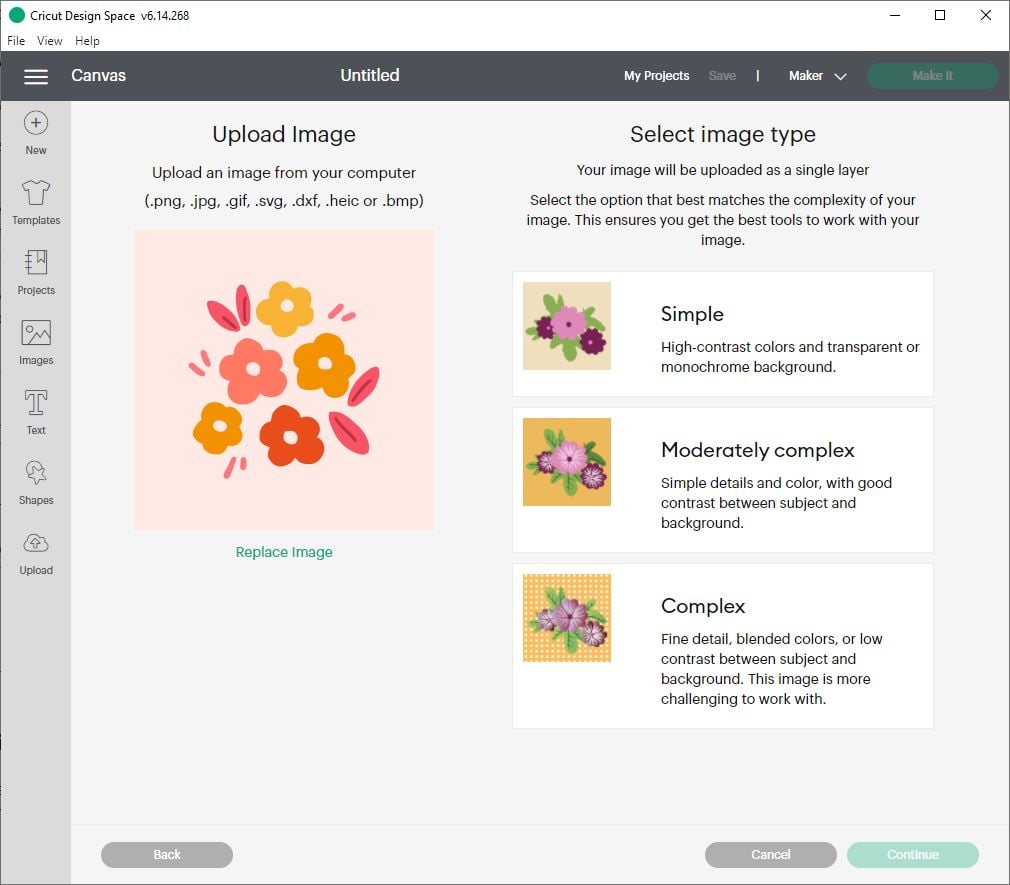
Background Remover Tools
On the adjacent screen, Design Space will give you several options to remove any unwanted background colors or other areas from your paradigm.
If you are a Cricut Access member, you can use the Background Remover tool to remove the background automatically.
If yous are not a Cricut Access member, yous tin can still utilise the Manual tool options: Select, Erase, and Crop.
Choose either the Select and Erase, Erase, and/or Crop tools to remove parts of the image that you don't want to use.
- Select and Erase: Select an area or color range in your image, then erase information technology. Use the Advanced Options push to change the tolerance (or sensitivity) of the tool.
- Erase: Click and hold to erase sections of your epitome. You can change the size of your erase tool by moving the slider.
- Crop: Utilise the crop tool to erase rectangular sections of your image.
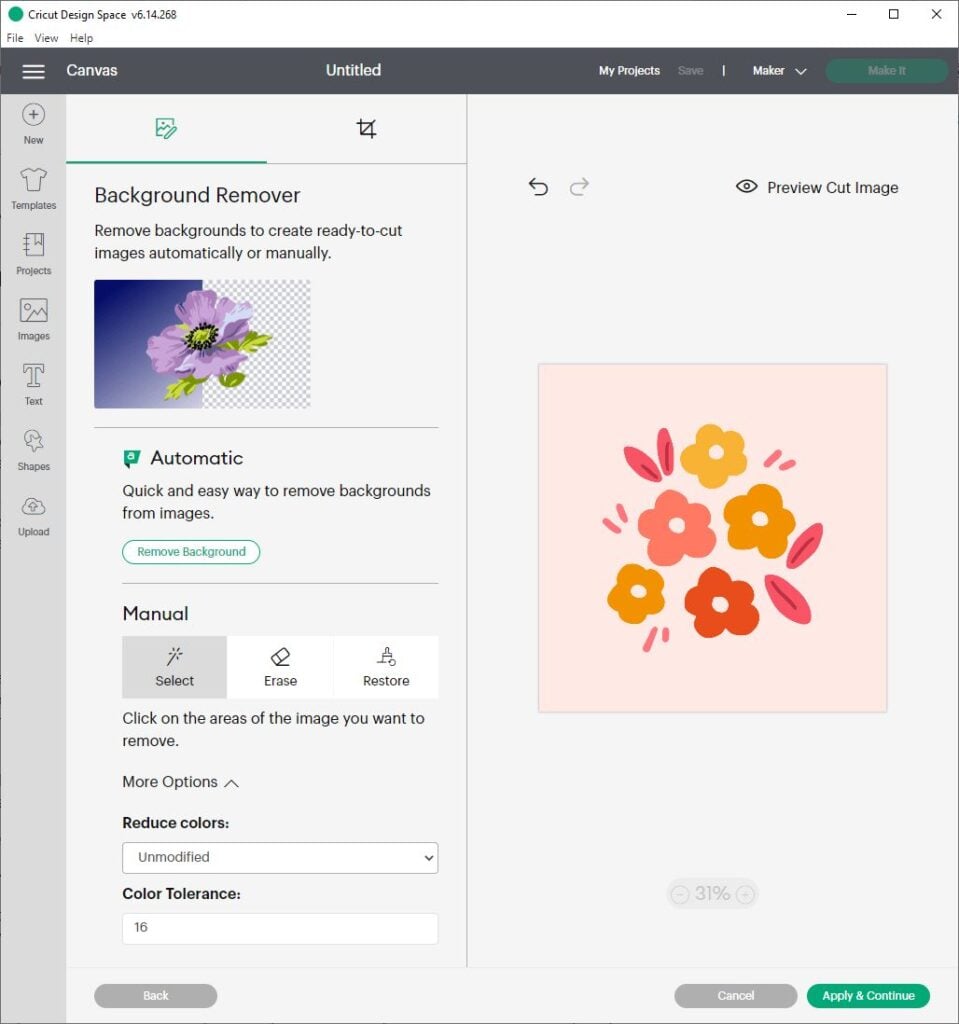
In this example, I want Design Infinite to keep the blossom and leaf shapes, just not the background. So, I used the Select and Erase tool to click on the calorie-free pink background expanse to remove it from the image.
You lot can utilise the buttons in the top-right corner to zoom in or out equally needed to see all parts of your image. (I made sure to zoom in and erase the light pink background color in each of the blossom centers.)
Footstep four: Name and Salve the Image
Select Preview to see what the final Cut Paradigm volition expect like. The solid gray expanse represents the contours of the image that you lot will come across on your Design Space sail. The gray checkerboard groundwork indicates areas on the image that have been removed – these areas are now transparent and volition not be cut. If you run into whatever areas yous have missed, click Hide Preview to return to the Select and Erase Screen. When you lot are happy with the epitome, select Keep.
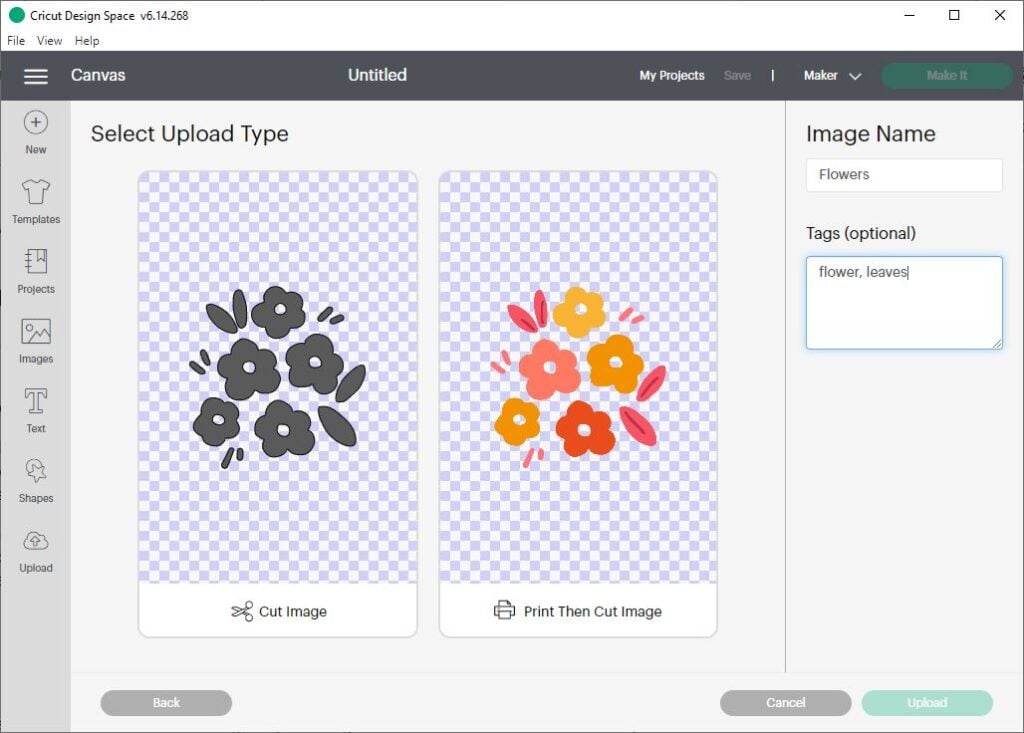
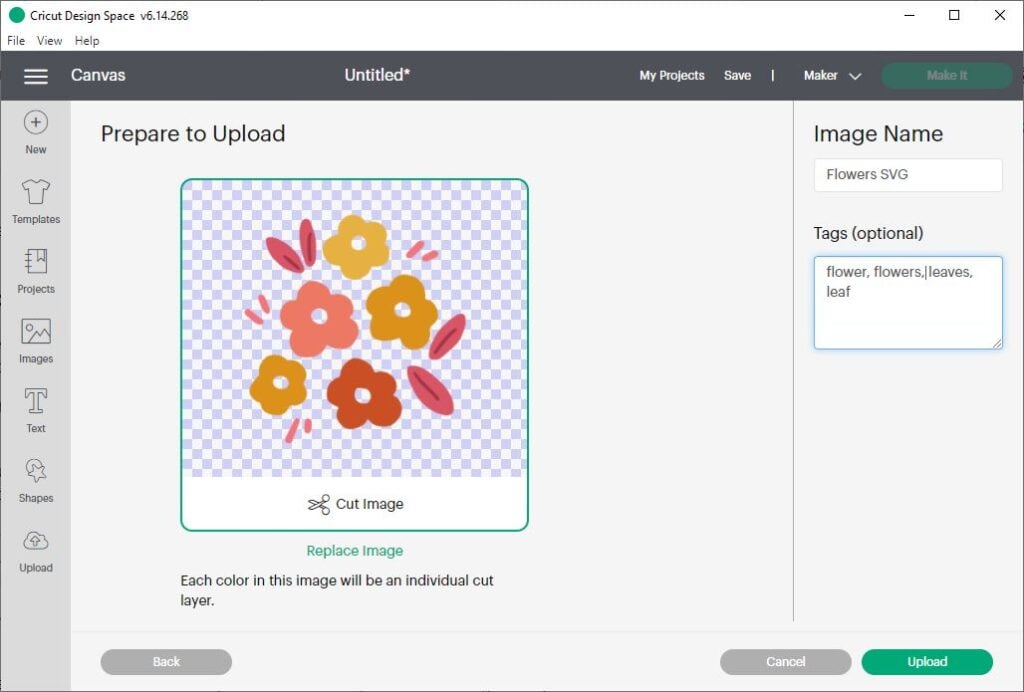
On the next screen, choose whether to save your epitome as a Cut Image or a Print So Cut Epitome. If yous cull Cutting Image, the paradigm will be saved equally a solid shape only – all colors and patterns will exist removed. If yous cull Print Then Cut Image, the paradigm will save with the colors and patterns intact. (Choose this option for Print Then Cutting projects, like stickers or printable vinyl projects.)
Finally, name your prototype and give it a few tags (keywords) and so that you can search for it later. Select Upload. You will now see your image in the Recent Uploads epitome library at the bottom of the screen.
To add the prototype to your design, click on the image to select it. And so click Insert Images to add together it to your Canvas design screen.

In this instance, since I saved the flower paradigm as a Cut image, the prototype is added to the Canvas screen as a unmarried layer. I can now cut this shape out of paper, vinyl, or any other material I want.
Selection 2: Uploading Vector Images
Proficient news – uploading vector images to Cricut Design Space is even easier than uploading raster images.
Select the vector image (ends in .svg or .dxf) that you lot want to upload. You can select information technology in your file folder, or drag and drop the folder to the Design Space image upload window.
Step three: Proper name and Salvage the Image
On the next screen, you will run into a preview of your selected file. Requite your file a proper name and a few descriptive tags (keywords), then y'all can observe it afterward. So select Upload.
You lot will return to the Upload screen, where you will see the epitome in the Contempo Uploads image library at the bottom of the screen. To add the image to your project, click on the image to select it, then select Insert Image to add information technology to your Canvas.

Note: If the vector image yous've chosen was designed with multiple layers, the layers will be grouped together on the Sail. You will be able to run into the individual layers in the Layers Panel on the correct-hand side of the Canvass screen. If y'all want to move or resize the layers individually, y'all must first ungroup them.
Where to find images you've already uploaded
Hither'due south how to observe all the images that yous've uploaded to Blueprint Infinite.
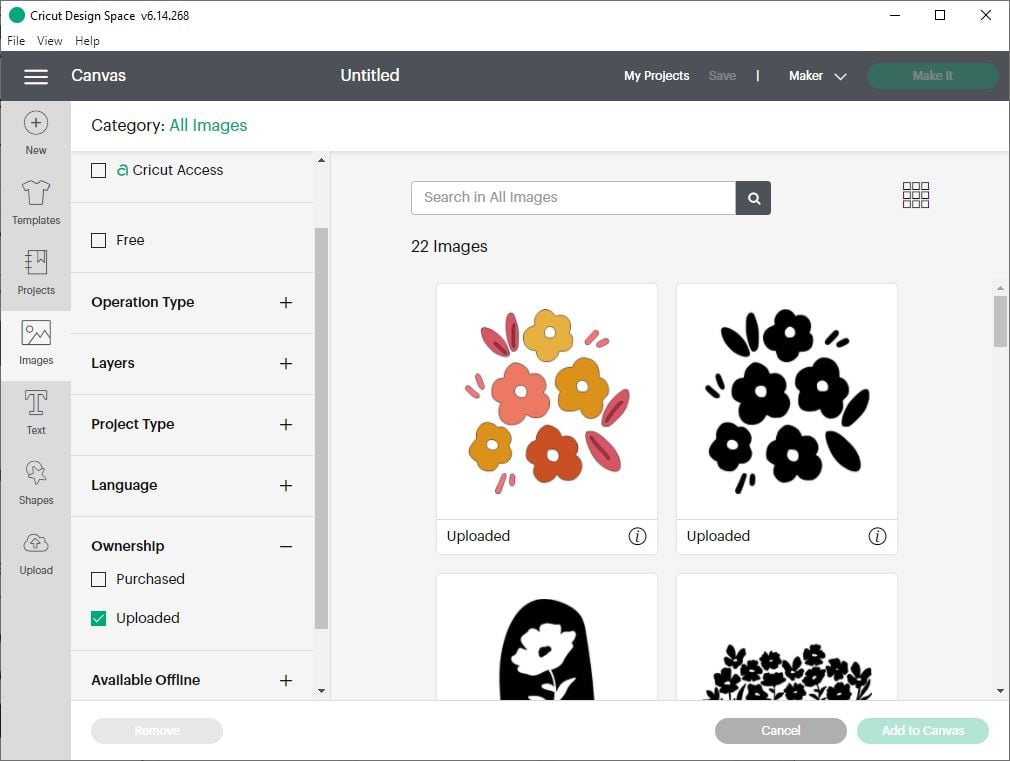
First, click on the Images push button to see the Cricut images Library. From here, you can search for an image by its name or tag. You tin can also select Uploaded from the Ownership filter on the left-hand menu drib-down to see only those images that you've uploaded yourself.
Troubleshooting Epitome Uploads
Here are a few frequently asked questions about uploading images to Cricut Design Infinite.
Why is my image solid gray?
Raster (pixel-based) images like .jpg and .png will upload as a single shape layer. If you choose to save the image as a Cutting Image, Cricut Blueprint Infinite will catechumen it to a solid, cuttable shape.
If you want to go on all of the interior details – such as multiple colors, patterns, etc. – make sure to relieve the image as a Print Then Cut epitome. You can then apply the epitome in Print Then Cut projects, similar stickers or printable vinyl projects.
How do I upload images on the iPhone app (iOS app)?
Uploading images to the Cricut Design app on your phone is very similar to the steps I've outlined above. The simply deviation, really, will be the layout of the screen.
- Open the app and create a new Canvass.
- Click the Upload button in the lesser bill of fare bar.
- Have a photograph, select a photo from your Photo Libary, or select a photo from your Files.
- Employ the Remove, Erase, and Crop tools to make clean upwardly your image. Use the preview image in the tiptop right corner to see what your cut file volition look like.
- Refine the cut paths using the Despeckle and Smooth tools.
- Select the Upload type – either a Cutting epitome or Print So Cut prototype. Then, name your prototype and press Save.
Help, I can't remove the background.
It tin exist hard to use the Select and Erase tool to isolate the main subject area of a photograph if the groundwork is likewise complex, or if there is low contrast between the subject and the background. In this instance, your best bet is to use the Eraser tool to manually erase the parts of the epitome that you lot don't want to cut.
My cut prototype looks blurry or pixelated.
When choosing a raster prototype (.jpg or .png) to use as a cutting file, expect for a simple epitome with make clean lines and solid colors. This will assistance your Cricut create the cleanest cut file possible. (Remember that if you enlarge a low-resolution .jpg epitome, it's going to expect blurry or pixelated.)
More than Cricut Design Space Tutorials
If y'all dearest Cricut and want to learn more about Design Infinite, here are some posts you lot may be interested in.
- How to Connect Cursive Letters in Cricut Pattern Space
- When to Utilise Weld vs. Adhere in Cricut Design Space
- How to Make a Monogram in Cricut Pattern Space
Have questions? Join the Facebook Group!
I hope this article was useful for you! If you have whatever additional questions, feel free to join my Facebook Group. I created this group for y'all to share pictures, inquire questions, and help each other out.
What'southward Next?
Pin this post: Save this tutorial to your Pinterest boards so that you tin come up back to it after.
Leave a comment: I beloved to hear your feedback. Tell me in the comments below!
Share on Instagram or Facebook: When you lot make this project, share it on social media and tag me @sarahmaker. I love to see what you make!
Materials
- JPG or SVG image file
Tools
- Cricut Blueprint Space
Instructions
Raster Images
- Open up the Cricut Pattern Space software and start a new project. Select Upload.
- Select the Browse button to locate the image y'all desire to utilize from your computer. Or, if y'all accept the paradigm files ready, you can drag and drop the file into the upload window.
- Select the prototype type that best matches the complication of your paradigm. And so, use the Select and Erase, Erase, and Crop tools to remove parts of the image that you don't want to use.
- On the next screen, choose whether to save your image as a Cut image or a Print Then Cut prototype. Name your image, give it a few tags, and click Upload.
Vector Images
- Open up the Cricut Design Space software and start a new project. Select Upload.
- Select the Scan button to locate the image you want to use from your computer. Or, if you take the image files set up, you can drag and drop the file into the upload window.
- Name the paradigm and add a few descriptive tags (keywords), then you can discover it later on. Then select Upload.
martinmitersell1936.blogspot.com
Source: https://sarahmaker.com/upload-images-cricut/
0 Response to "What Is the Largest Size You Can Upload to Cricut Design Space"
Post a Comment